[:en]Hello world!
Due to a recent friend request, I share you how to make some test in a test server without need to worry about the change on the IP address.
We have to recognize it, it’s pretty hard to remember an IP, specially if this is changing continously. To accomplish that, we can count with very interesting services, one of them is No-IP, which is very useful on this situations. The company provides a service of host/redirect, when this feature is used with a software client, it allows to the users to access the personalized subdomains created by them in the domains offered by No-IP.
To make use of this services is completely necessary to count with a No-IP account. Create one is a process that won’t last more than five minutes. Once when we finished up the sign up process we’ll download the client named “DUC”. This software, created by No-IP is available for Windows, Mac and even Linux (Ubuntu, at least). It can be downloaded at http://www.noip.com/download. The installation is fast, the software very light-weight and only require us to give the No-IP’s service user and password.
Getting back to the creation of the personalized host it is necessary to follow the next steps:
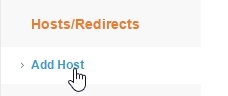
In the aside menu, we click on the link “Add host” in the “Host/Redirects” subsection.
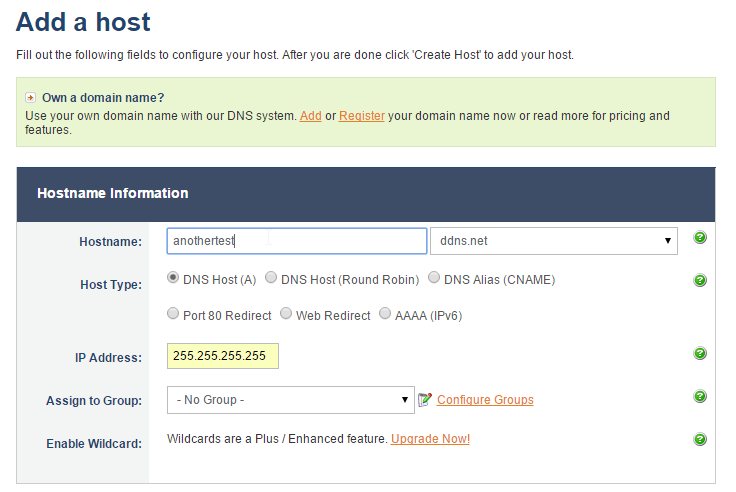
After that, we’ll see a page to add a new host. Here we type a hostname, and we’ll also select one of the free domains from list. To finish, we’ll click on the “Add host” option.
At the end, we’ll be in front of list of all the available host (which we created). Of course, the one recently created will be included.

At this point, the configuration part will be done. Now, we’ll work directly in the No-IP’s DUC.
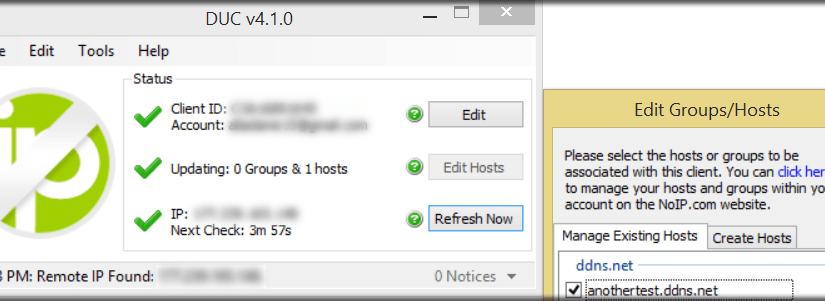
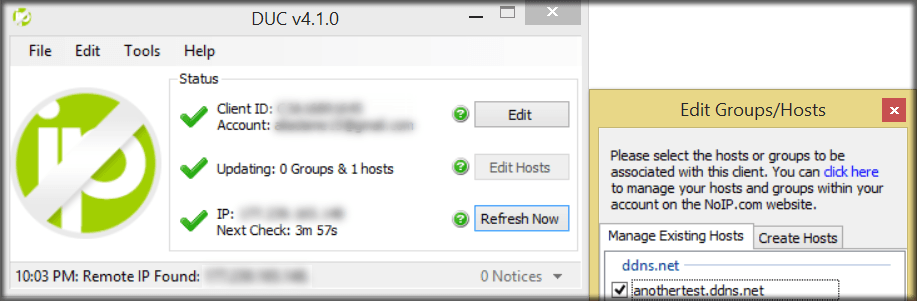
In the screenshot below we’ll see the main program screen, we have pressed the “Edit Hosts” button.
In this option we select the host which we plan to use on the local server.
We are all done! No-IP will handle the rest: Once we visit our free host No-IP will use their technology to keep updated in the No-IP DNS’s our IP address, hence, when we visit the domain we’ll see that is perfectly working.

Voilá! Now we can point to our test server if we don’t have an static ip. Piece of cake, don’t you think?[:es]Hola mundo!
Debido a la reciente solicitud de un amigo, les comparto cómo es que pueden llevar a cabo pruebas en su servidor de pruebas sin tener que preocuparse por el cambio en la dirección de su IP.
Tenemos que reconocerlo, es muy dificil recordar una IP, en especial si ésta cambia continuamente. Para ello podemos contar con servicios muy interesantes, uno de ellos es No-IP, que es de gran utilidad en estas situaciones. La empresa provee un servicio de host/redirect que usado con su programa cliente permite que los usuarios accedan a subdominios personalizados creados por ellos mismos que hacen uso de los dominios gratuitos de la compañía.
Para hacer uso de estos servicios es necesario contar con una cuenta de No-IP, cosa que no demorará mas de cinco minutos en hacerce. Una vez creada la cuenta, descargaremos el programa cliente llamado DUC. El cliente está disponible para Windows, Mac e incluso Linux (Ubuntu al menos). Se puede descargar en: http://www.noip.com/download. La instalación es rápida, el programa ligero y solo requiere que le demos nuestros datos de usuario de la cuenta de No-IP.
Volviendo a la creación del host personalizado es necesario seguir los siguientes pasos:
En el menú lateral, acceder a la liga “Add Host” de la subsección “Host/Redirects”.
Después de eso, veremos la página para agregar un nuevo host. Aquí escribiremos el hostname, y seleccionaremos también algunos de los dominios gratuitos. Para terminar, hacemos click en la opción de agregar.
Al terminar, veremos nuestro host recién creado entre los hosts disponibles.
Para este punto, la parte de configuración habrá terminado. Ahora trabajaremos directamente en el DUC de no No-IP.
En la captura de abajo vemos la pantalla principal del programa, hemos presionados el botón “Edit Hosts”.
En esa opción seleccionamos el host del que planeamos hacer uso en nuestro equipo.
Listo! No-ip se encargará del resto: Una vez que visitemos nuestro host gratuito No-IP usará su tecnología para mantener actualizados en sus DNS dinámicos nuestra IP, por lo que al visitar el dominio veremos que funciona a la perfección.
Voilá! Ahora podemos apuntar a nuestro servidor de pruebas si no tenemos una dirección IP estática. Fácil, ¿no crees?[:]